
Issue:
You need to push out an Autodesk package in PDQ Connect
Solution:
- Follow this blog to create an Autodesk Custom install deployment: https://resources.imaginit.com/support-blog/creating-a-deployment-for-autodesk-products
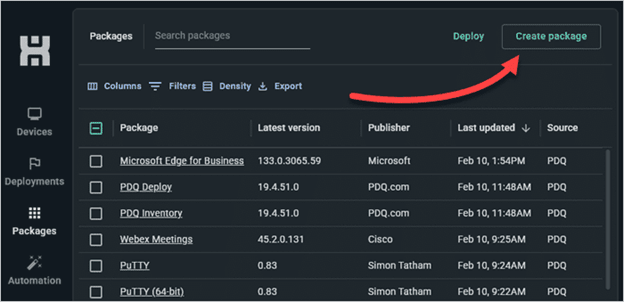
- Sign in to PDQ Connect, then navigate to the Packages tab.
- Click the Create package button in the top right.
- Name the package, set the Timeout setting to something like 60 or 120 minutes. The timeout setting can be adjusted later once you have a better idea of how long the deployment takes to complete. This largely depends on your target device’s network bandwidth.
- Next, click Add install step.
- Next, click Attach installer, then attach the customized Autodesk downloaded deployment file that you built earlier. Add this command to the parameters field to silence this step and create a log file: -q -p C:\Windows\Temp\ODISdownloaderLog.
- Add success codes: 0,1641,3010,2357302

- Next, click the drop-down arrow next to Add install step, then click Add script step.
- Add the install command. Right-Click the install Autocad xxxx.bat in the deployment and choose Edit in Notepad. Copy the install the deployment silently command (Do not copy rem) -----------------------------------------------------------------------------------------------------------------EXAMPLE:
chcp 65001
rem ========== Install the deployment with basic UI ==========
"c:\autodesk\acad2025\image\Installer.exe" -i deploy --offline_mode --ui_mode basic -o "c:\autodesk\acad2025\image\Collection.xml" --installer_version "2.13.2.67"rem ========== Install the deployment silently ==========
rem "c:\autodesk\acad2025\image\Installer.exe" -i deploy --offline_mode -q -o "c:\autodesk\acad2025\image\Collection.xml" --installer_version "2.13.2.67"rem ========== Uninstall the individual product ==========
rem ========== Uninstall Autodesk AutoCAD 2025 - English
rem "c:\autodesk\acad2025\image\Installer.exe" -i uninstall -q --manifest "c:\autodesk\acad2025\image\ACD_2025_en-US\setup.xml" --extension_manifest "c:\autodesk\acad2025\image\ACD_2025_en-US\setup_ext.xml"----------------------------------------------------------------------------------------------------------------
Copy this info from the Autodesk BAT file and add it to the Cmd window in PDQ Connect.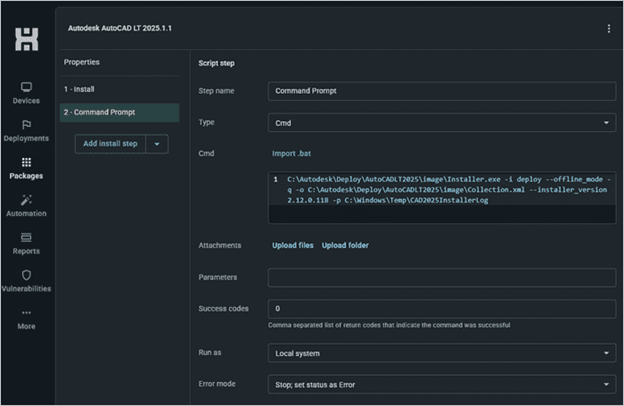
- Next, click Save to save and close the package creator.
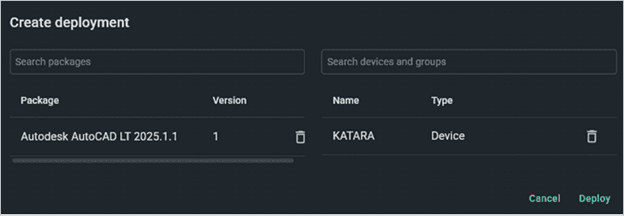
- With our Autodesk application package in PDQ Connect complete, we’re ready to deploy it. In the Packages tab, select the Autodesk package, then click Deploy. In the deployment window, add your devices or groups that you want to target, then click Deploy.
- NOTE: If this is your first time deploying the package, I recommend sending it to a couple Test machines to ensure the package is working properly. Once you’ve tested it enough, you can deploy it to more targets, but keep in mind that it may have a pretty heavy impact on the target’s network bandwidth. Also, watch the deployment times and alter the package timeout settings accordingly.
About the Author
Follow on Linkedin More Content by Ken Williams


