Welcome again to my ongoing series covering IMAGINiT’s Utilities for Revit. In this latest iteration, we will explore the ‘Sheet Number Update’ tool—a powerful feature that streamlines the process of renumbering sheets within your Revit projects.
Overview of the 'Sheet Renumber' Utility
Managing and organizing sheets in Revit can be a daunting task, especially for large projects with extensive documentation. The 'Sheet Number Update' tool is designed to automate and simplify this process, ensuring that your sheet list remains sequentially numbered and free from gaps. This utility is invaluable for architects, engineers, and BIM managers who need to maintain a coherent and well-ordered set of drawings.
Key Features and Benefits
1. Automated Renumbering: The primary function of the 'Sheet Number Update' tool is to automatically renumber sheets. This saves time and reduces the potential for errors that can occur when manually updating sheet numbers. The option to manually renumber the sheets in the setup dialog is also available.
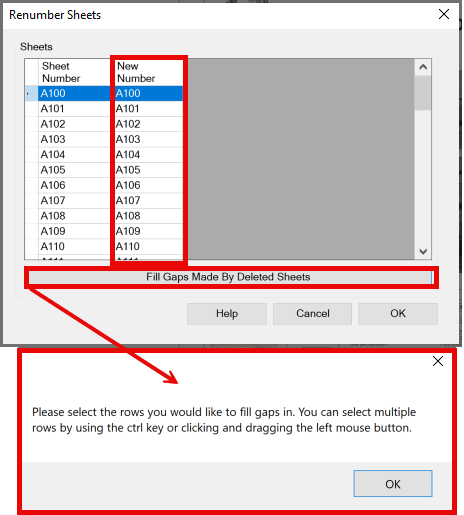
2. Gap Filling: Over the course of a project, sheets may be added or removed, leading to gaps in the numbering sequence. The 'Sheet Number Update’ tool identifies and fills these gaps, ensuring a continuous sequence. Using the ‘Fill Gaps Made By Deleted Sheets’ button in he dialog allows these gaps to be automatically filled in if there are still gaps present after the utility automatically generates a new sequential sheet list in the ‘Renumber Sheets’ setup dialog.
3. Customizable Parameters: Users can customize the renumbering process according to their project requirements. This includes setting the starting number, increment values, and the ability to exclude certain sheets from the renumbering process.
4. Batch Processing: For large projects, the ability to renumber multiple sheets simultaneously is a significant advantage. The 'Sheet Number Update’ tool allows for batch processing, making it efficient and user-friendly.
Step-by-Step Guide to Using the 'Sheet Renumber' Tool
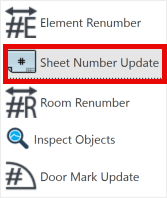
1. Access the Tool: Open your Revit project and navigate to the IMAGINiT Utilities tab. Select the 'Sheet Number Update’ tool from the list of available utilities.


Select the ‘Renumber’ drop-down menu from the IMAGINiT utilities tab on the Revit Ribbon, then select ‘Sheet Number Update’ from the menu.
2. Configure Settings: In the ‘Renumber Sheets’ dialog box, configure your settings. Choose your starting number, set the increment, and specify any sheets you want to exclude.

Users can either automatically fill in gaps or select individual rows and edit sheet numbers manually.
3. Apply Renumbering: Once you are satisfied with the preview, apply the renumbering. The tool will automatically update the sheet numbers, filling any gaps and maintaining a sequential order.

After selecting ‘Fill Gaps Made By Deleted Sheets’, users are prompted to select the rows that they would like to automatically have filled in.
4. Review and Finalize: After the renumbering process is complete, review the updated sheet list. Make any necessary adjustments and finalize the changes by clicking ‘OK’ in the dialog boxes.
Practical Applications
The ‘Sheet Number Update’ tool is particularly useful in the following scenarios:
- Project Milestones: During key project phases, such as design development or construction documentation, where accurate and organized sheet numbering is critical.
- Revisions and Updates: When adding or removing sheets due to design changes, ensuring the numbering remains continuous and logical.
- Quality Control: As part of your project quality control process, maintaining a well-ordered set of sheets can help in identifying missing or out-of-sequence drawings.
The ‘Sheet Number Update’ tool in IMAGINiT’s Utilities for Revit is a robust feature that enhances the efficiency and accuracy of managing sheet numbers in your projects. By automating the renumbering process and filling gaps, it allows you to focus on the more critical aspects of your design work. Stay tuned for the next installment in this series, where we will explore other powerful tools within the IMAGINiT Utilities for Revit toolbox.
About the Author
Follow on Linkedin More Content by Scott Green


