
Issue:
Using Sheet Set Manager (SSM) with Plant 3d on a local network was not an issue, because the project was on the local network server and SSM could add the sheets from the project to edit the properties in the title block and to add basic line work without any issue. With projects created and accessed from Autodesk Construction Cloud (ACC), Plant 3D creates a cache version of the project under each user’s user folder. When using Autodesk Desktop Connector, a version of the project shows in C:\Users\Username\DC\ACCDocs\Project Location but changes to the files in this location will be overwritten by Plant 3D when a user makes change in the project and checks the file back in.
Causes:
Plant 3D creating the working project cache files and folders in C:\Users\lUsername\AppData\Local\Autodesk\AutoCAD Plant 3D\CollaborationCache and those using Sheet set manager in AutoCAD do not have access to these files.
Solution:
To use a Sheet Set Manager with Plant 3D file on Autodesk Construction cloud, you will need to create the fields in Plant 3D and then use SSM to add/change properties value in AutoCAD. Custom Drawing properties and project properties set up in Plant 3D will pull the values from the plant Project.
Setting up fields in AutoCAD P&ID template file:
1. Open the drawing template file for P&ID to add the fields needed for the project. We will use the P&ID default template for this example.
2. To add fields, use either mtext, dtext, or attributes. Select mtext from the annotation tab on the ribbon or type mt. and select location for the mtext box, right click and select insert field or select insert field from the ribbon.

3. In the Field dialog box change the Field category: to Sheetset
4. To add the project name field, select CurrentSheetSetProjectName from the Field name:
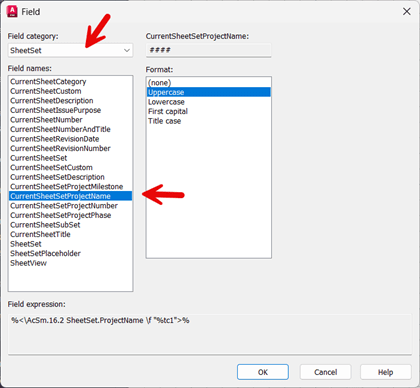
5. Set the format for the value, select Uppercase and then OK. Note change the justification and text height as needed for the project.
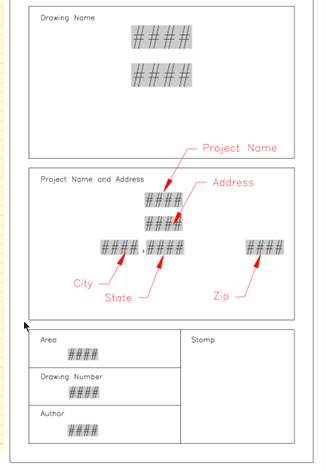
6. Repeat the process using CurrentSheetSetCustom to create address, city, state, and zip. For the Custom property name: type each field name

7. Save and close the template
Next, we will use AutoCAD to set up the sheet set project.
Open AutoCAD, start a new drawing to open Sheet Set Manager (SSM)
1. Type ssm to start a new sheet set.
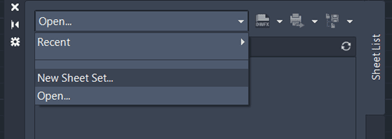
For this example, we will create a sheet set using existing drawings to start from defaults.
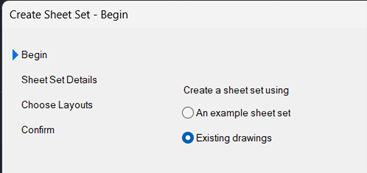
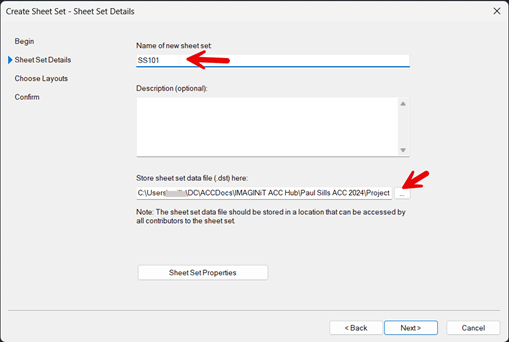
2. Give your sheet set a name and select the project folder in ACC for the DST file.
C:\Users\UserName\DC\ACCDocs\IMAGINiT ACC Hub\Paul Sills ACC 2024\Project Files\SSM.
3. Select Next.
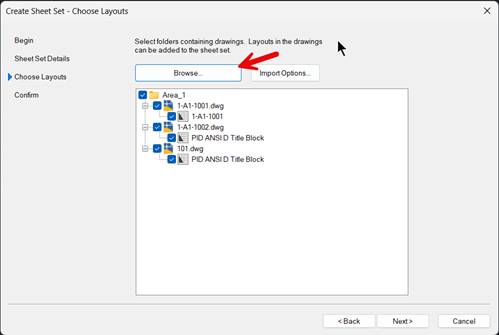
4. Select Browse to browse for the P&ID file on ACC. C:\Users\UserName\DC\ACCDocs\IMAGINiT ACC Hub\Paul Sills ACC 2024\Project Files\SampleProject\PID_DWG\Area_1
5. Select next to open Sheet Set Manager for the Web
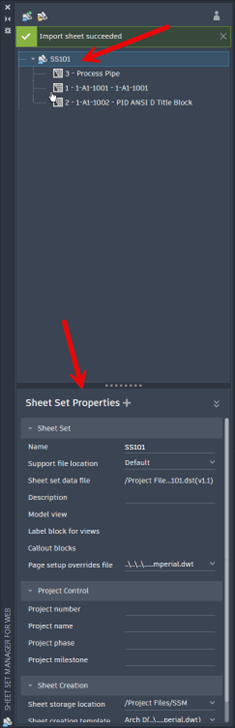
6. Select the SSM name SS101 at the top, and midway down on Sheet Set Manager for Web palette select Sheet Set Properties to add project and or sheet properties.
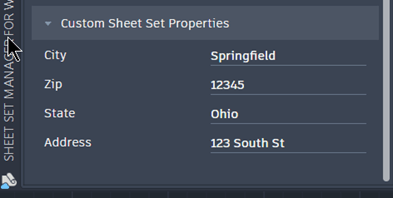
7. When selecting the + an option for adding new sheet set property and new sheet property displays. Select New sheet set property to add address field. Repeat steps to add city, state, and zip matching case used when developing the fields on the template title block file.
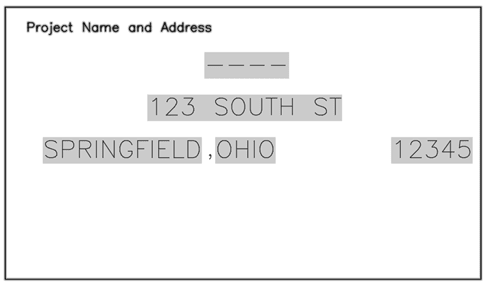
8. Enter the data after creating each/all the properties. Address: 123 South St., City: Springfield, State: Ohio, and Zip:12345
9. Double click or right click and select open to open one of the Plant 3D files.
This process is only unidirectional, information shown when opening the file through the sheet manager will not show when opening the file in Plant 3D.
For additional information on sheet sets see blog:
https://www.autodesk.com/blogs/autocad/tag/mastering-autocad-sheet-sets/?redirected=1
About the Author
Follow on Linkedin More Content by Paul Sills


