

Issue:
project upgrades involve many different parts that may confuse users.
Causes:
Revit project upgrades are a very expensive process and should proceed with caution.
Upgrades can be time-consuming and involve the entire project team, so they do not usually happen often.
Solution:
This article is prepared to guide you through the process.
Requirements:
1. Kick-off meeting with the entire project team’s stakeholders.
2. Coordinate the timeframe and prepare for weekend overtime.
3. Coordinate the version of Revit that the project is upgrading to.
4. Involve IT teams from all participating teams to install the matching version and build of Revit prior to upgrading the project.
5. Prior to the upgrade, test the upgrade process.
Upgrading Revit Project:
Determine the Revit project environment. Depending on which platform the Revit project is stored on, the upgrade process can be radically different.
Upgrading Revit Project Process for Local Server Projects:
1. Create a backup of each Revit model using E-Transmit.
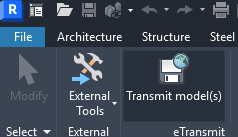
2. After creating backups for each model, notify the entire team and BIM Manager that the project is ready for the upgrade.
3. The upgrade process should occur at the same time as your external consultants.
4. Open the version of Revit that the project is being upgraded to. Install the version if it is not already available. Make sure to install the version agreed upon by the entire team.
5. Open the Revit project file. It will go through the upgrade process when opened.
6. After opening the file, synchronize to central, then close the model.
7. Repeat Steps 4 through 6 until all Revit files are upgraded.
8. Request upgraded files from your consultants.
9. Open the project file again and repath all linked files to the upgraded versions.
Upgrading Revit Project Process for Forma Environment:
1. Make sure the Revit version that the project is upgrading to is installed for all users.
2. Notify the Hub administrator after installing the Revit version for all users.
3. The Hub administrator will navigate to Data Management > Settings > Revit, then select the version that the project is upgrading to and run a test upgrade to identify any issues.
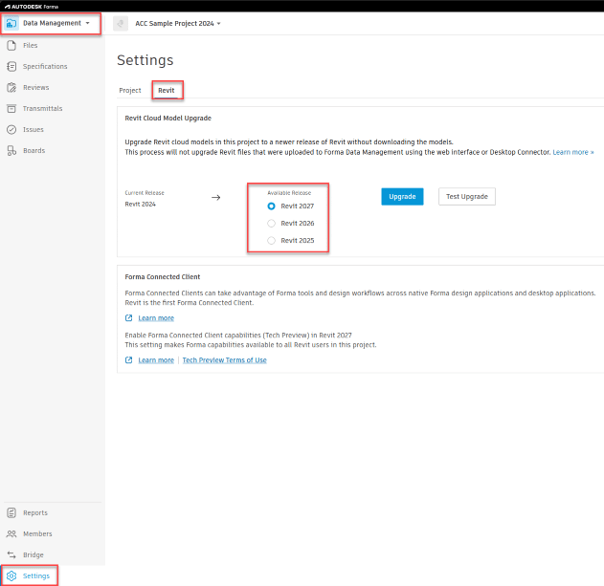
4. Review the test upgrade log and confirm whether any issues are present.
5. Once no issues are identified, run the upgrade.
6. The project will upgrade automatically to the newer version for all initiated Revit files.
7. If there are any Revit files that were not initiated from Revit but were uploaded directly through the Data Management website, those files will require manual upgrades.
8. After the upgrade is completed, the project will no longer be accessible from older versions of Revit. All users must open the newer version of Revit to access the project files.
About the Author
Follow on Linkedin More Content by Gregory Lee


